*NOW BOOKED FOR 2024* Transitmania 15 @ Santa Pod 19th to 21st July 2024 *ALL DETAILS HERE*


Eradicating the tinwork from my van . . !!!

This forum can be used to update other members on your progress with your Transit.

Postby Transitwalla » Fri Apr 21, 2006 8:58 pm

Right . . had another go today with the welder :) and started here
Image

Image
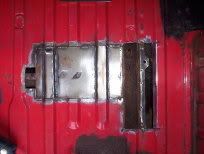
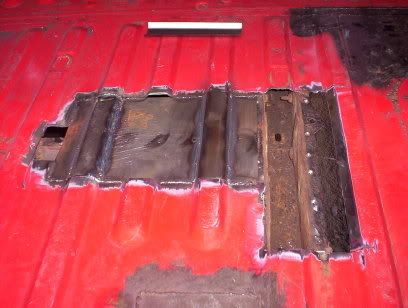
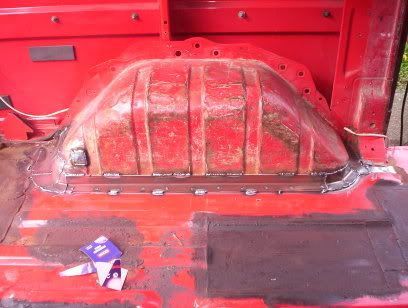
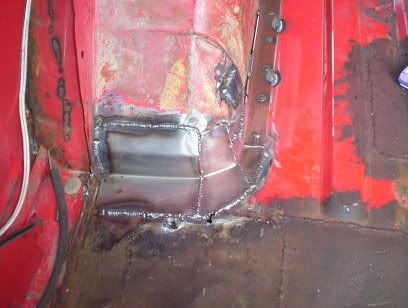
Rather than show a before and after shot . . I thought I would show a work in progress type of shot...having cut away part of the floor, yet again, I realized the job was a little bigger than I thought but what the heck...better than going to prison :( I thought so set about it with a vengeance...didnt get the job finished before her indoors returned from the curryhouse with a Chicken Tikka Bhuna, garlic nan and a can of beer :D :D for me tea. Still I managd to this done though and will need to go to work on me motorbike in the morning :x 8). Hope the weather stays kind in the afternoon so I can get it finished off . . .Cant shake this feeling I have . . that I'm just using this van for practice...
Image
Imagination....our only limit....
there's no such thing as a daft question.

Jim.
User avatar
Transitwalla
Transit Aficionado
Transit Aficionado
 
Posts: 330
Joined: Fri Apr 07, 2006 11:50 pm
Location: Shepshed - Leicestershire

Postby Gunslinger » Fri Apr 21, 2006 9:54 pm

transit.jono wrote:Thanks-done deal-----Cheers.


:?: :?: .... did you send them ? because i dont think i have seen anything in my email today, unless mailwasher bounced it back to you.

-----------------------------------------------------------------------------------

interesting "work in progress" picture, i am still trying to get my head around what your doing there .......

working from right to left, the first hole i guess is to the outer side of the chassis rail ... is that ground i can see through it ? (hard to tell as it seems out the same colour) or is the chassis "doubled up" at that point, just looks too wide and with an upright piece in the center of it :?
Then the next sort of hole looks into the chassis rail, right ?
Then you seem to have what looks like 5 repair strips/sections, like you had done one strip for each section either side of the rib then welded a ribbed section in, alll except that middle rib, or did you weld one flat piece in then add the raised rib section after to keep the profile correct ?
(i am sort of lucky as i have access to bending facilities so if i need to i can do stuff all in one like that, but generally tend to just use thicker stuff :P )
then on the far left another hole ..... did that one sneak up on you ? :D ... i know that feeling when you make a plate up and then find the metal to one side was not so good and you end up with a patch on the end as well !! ..... thats why i now make templates up first and mark those onto the vehicle and clean around it before i even cut the metal for the new panel
User avatar
Gunslinger
Transit Devotee
Transit Devotee
 
Posts: 1720
Joined: Sun Apr 03, 2005 12:24 pm
Location: west oxfordshire

Postby Transitwalla » Fri Apr 21, 2006 11:15 pm

Gunslinger wrote
> or did you weld one flat piece in then add the raised rib section after to keep the profile correct ?

Yeah thats how I did it . . flat piece then the raised ribs, you can see one of the ribs I made at the top of the second picture....Yep you can see the floor to the right of the chassis rail and basically the hole was cut then the plates I had were made to fit....kinda like a patchwork floor. What I didn't photograph was the center rail running left to right...welded a piece of angle iron to the top of it. All it needs now is for me to get underneath with the welder and finish the job properly. Copious amounts of underbody sealant will, hopefuly, provide a reasonable barrier to the elements. The Father In Law owns his own garage, has a ramp that I can use :) so that's going to make things a lot easier....could also spray the underneath with old engine oil . . .
I'm always open to suggestions on other ways of doing a particular job... this being the first time I have undertaken this kind of repair to this extent...in the past I've always stuck a plate on and hoped for the best. . .cover up jobs rather than replacement jobs.... :roll:
Image
Imagination....our only limit....
there's no such thing as a daft question.

Jim.
User avatar
Transitwalla
Transit Aficionado
Transit Aficionado
 
Posts: 330
Joined: Fri Apr 07, 2006 11:50 pm
Location: Shepshed - Leicestershire

Postby Gunslinger » Fri Apr 21, 2006 11:46 pm

the way that you have done it is going to provide maximum protection from underneath, it does leave you with a "box section" where each rib is, and also the hole underneath where the original rib meets your flat panel.
I might have been tempted to spray it with weld through primer to get some sort of protection (UPOL weld through spray is good but expensive)

as for strength it should be fine, maybe a little more flexable than one piece with the bends in it.

Because you have made it flat underneath, stitch weld it underneath and then seam seal it, the original is a little harder to seal because of the ribs

i would have been tempted to make the flat plate cover all of the holes, and extend over the chassis section too

You could also get some of that rust cure stuff and coat the inside of the chassis leg while you have it exposed (dont get the stuff from hammerite called "Krust" its sh*t, try truscan)
User avatar
Gunslinger
Transit Devotee
Transit Devotee
 
Posts: 1720
Joined: Sun Apr 03, 2005 12:24 pm
Location: west oxfordshire

Postby Transitwalla » Sat Apr 22, 2006 9:03 pm

Gunslinger wrote; and also the hole underneath where the original rib meets your flat panel.

Well here's the thing . . .I welded a small plate across the holes at each end sealing it from the inside before and sprayed a light coating of red oxide primer to the inside before welding the ribs in place. . maybe all the heat will have burnt the primer off but . . .as I cant get in there to have a look..... In hindsight though...If I was going to attempt this kind of epic repair job again . . I would probably rip the whole floor out and start fresh with light gauge checker plate :) strengthening / replacing the crossmembers as I needed to.
Image
Imagination....our only limit....
there's no such thing as a daft question.

Jim.
User avatar
Transitwalla
Transit Aficionado
Transit Aficionado
 
Posts: 330
Joined: Fri Apr 07, 2006 11:50 pm
Location: Shepshed - Leicestershire

Postby Gunslinger » Sat Apr 22, 2006 10:37 pm

hhmmmmmm ..... checkerplate ...... my favourite :P :lol:
User avatar
Gunslinger
Transit Devotee
Transit Devotee
 
Posts: 1720
Joined: Sun Apr 03, 2005 12:24 pm
Location: west oxfordshire

Postby transit jono » Tue Apr 25, 2006 3:17 pm

Sent pictures of the current state of my van to Mr Gunslinger today.New floor not arrived.
I've just bought a MIG myself,as you said Teamster "use or lose it".I haven't welded for a couple of years (borrowed the gear)-it took my ages to get back into the swing back then.I descided to repair an inner wing on a 1600e which grew into a large job.
I've got my Hallmark and another 1600e that need doing,hence buying a MIG.
Jono
transit jono
MK3 Massive
 
Posts: 872
Joined: Wed Aug 24, 2005 2:07 pm
Location: Margate, Kent Coast

Postby Transitwalla » Wed Apr 26, 2006 9:29 pm

Well, ok then, here is the next installment. . .got around to repairing the wheelarch to loadfloor joints . . . :lol: :lol: I should laugh . . what joint, sadly I didn't take a before shot as the batteries had gone in the camera :oops:. I thought about this one and decide to use some small angle iron I had knocking about to give some badly needed stength....

Image

added a couple of patches towards the rear door and its nearly done :) just need to fill in those small blowthrough holes with a small patch.

Image

Once I get the wheels off I'll finish the job off properly but tidying up on the outside of the wheelarch. Hammerite or underseal :?: :?: if the arches dont look to bad after a tidy up I think I'll give them a lick of paint otherwise I'll splodge on some underseal. I've aready painted these new repairs in Hammerite black to see how they compare to the other repairs I've recently made . . time will tell :!:

And yes the cardboard in the foreground was used as a cutting pattern . . :wink:
Image
Imagination....our only limit....
there's no such thing as a daft question.

Jim.
User avatar
Transitwalla
Transit Aficionado
Transit Aficionado
 
Posts: 330
Joined: Fri Apr 07, 2006 11:50 pm
Location: Shepshed - Leicestershire

Postby transitgeoff » Wed Apr 26, 2006 9:41 pm

nice work,go with the feeling and get an oldan, might even be able to help there, hava a 79 mk2 ,2 owners very solid, cheep money, and before people vstart its one of my lads own motors :lol:
transitgeoff
Transit Extremist
Transit Extremist
 
Posts: 6574
Joined: Mon Mar 21, 2005 7:32 pm

Postby Transitwalla » Wed Apr 26, 2006 9:53 pm

TransitGeoff wrote
nice work,go with the feeling and get an oldan,

Thanks, will go for an oldan . . but will see how I get on with this old girl first at the next MOT....theres still loads to do to her so I still have loads of practice ahead :) .
Image
Imagination....our only limit....
there's no such thing as a daft question.

Jim.
User avatar
Transitwalla
Transit Aficionado
Transit Aficionado
 
Posts: 330
Joined: Fri Apr 07, 2006 11:50 pm
Location: Shepshed - Leicestershire

Postby Gunslinger » Thu Apr 27, 2006 12:02 am

LoL ... i am still finding little pieces of cardboard all over the place that i used for templates.

Interesting idea with the angle iron, looks like you had to weld all the way around that arch :(

where i had to do this i took the other route, and welded something thick into the floor and let it extend into the wheel well, and then patched/repaired the tub down to it, thus leaving the original lip around the inside, however had i had to replace as much as you did i would have been tempted to do what you have and lose the lip completely inside

@Transit.jono ...... yup got your pics will make a new post for you shortly with them in there :)
Last edited by Gunslinger on Thu Apr 27, 2006 11:18 am, edited 1 time in total.
User avatar
Gunslinger
Transit Devotee
Transit Devotee
 
Posts: 1720
Joined: Sun Apr 03, 2005 12:24 pm
Location: west oxfordshire

Postby Transitwalla » Thu Apr 27, 2006 9:30 am

Gunslinger wrote;

looks like you had to wed all the way around that arch

almost but not quite . . the loadfloor to wheelarch were hanging together by about 4 inches in total and most of that was towards the front :( . On the outside the lip that runs around the wheelarch will not now hold its own weight so I need to get out there and tidy everything up :)

I still get the feeling I'm using this van as practice :roll: and am willing to try something a little bit different to see how it comes out :). If it works....it works . . if not.... it doesn't and there's no real harm done :wink: Doing the wings will be the real tester . . will probably need to take the van off the road for a couple of weeks :lol: :lol: while I make good the repairs I can't see :lol: :lol:
Image
Imagination....our only limit....
there's no such thing as a daft question.

Jim.
User avatar
Transitwalla
Transit Aficionado
Transit Aficionado
 
Posts: 330
Joined: Fri Apr 07, 2006 11:50 pm
Location: Shepshed - Leicestershire

Previous

Return to Members Transit's - Progress Reports!


Who is online

Users browsing this forum: No registered users

This site contains affiliate links for which we may be compensated.