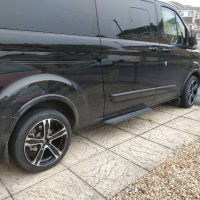
Side windows in at last, still got the back ones to do some time.
Drill two holes to mark the radius, find a suitable container of the dame diameter which can be lined up on the holes on the outside.


Drill a few small holes and link them together, creating an entry point for the jigsaw.

Moving on to the side door, the radius of the curves isn't symmetrical so rather than tracing around a suitable object, I drilled several holes and then sketched a curve between them.

Use masking tape on the outside of the panel to be removed, this should follow the line so you have a nice guide to saw to. It also protects the paintwork from the bed of the jigsaw which will collect the bits sawn away and make a right mess. Remember the saw will go off the straight line at corners so make sure masking tape will protect paint as it goes round the bend. Insert saw...

...and start sawing (notice the scratch on the paint...

As you're sawing, remove the masking tape and use it to join the gap where the saw has been. This helps stop the panel shaking around too much and stops the panel falling out and scratching your paintwork as it drops.
Once you have a hole, file the edges then pain them to stop them rusting (not 100% necessary on a bonded window, but good practice).


Tidy the edge with a rubber strip. Before I could do this, I had to stick carpet to the wall on the driver side (not bothering with the door). Carpet is cut to larger than required size and impact adhesive is applied to it's back. Impact adhesive is also applied to the van wall. If spraying the adhesive, tape something to the outside of the hole to stop the spray dripping down the side of the van. Apply the carpet after the adhesive has dried for the required time. Cut a hole where the window will be BUT ALLOW AT LEAST 3 INCHES extra carpet to reach the border of the hole. Press the carpet into the moulding, working on one corner at a time. Depending on the carpet, it can be hard work! I have heard that a hair dryer can soften the carpet and let it stretch more, BUT TRY IT ON SOME SCRAP CARPET BEFORE DOING THIS as it may melt the carpet. Once the carpet is in place, put the rubber edging on, trying to get it over the carpet.


Once the inside is trimmed, clean the glass and paintwork where the window adhesive will go. This may differ with adhesives/kits, so read the instructions. Once read, read them again. And again. Make sure you get it right first time because it's not easy to rectify a mistake at this point. Paint and glass cleaned, hold the window in place on the van and ask someone to draw around the inside. This line will give you an idea of where the adhesive will go and should not be primed on the inside of it. Remove the glass and prime it with the supplied primer. The line you had drawn is the inside of the rubber strip around the hole, prime 3/8 inch away from this. Prime the paintwork on the van, up to the rubber strip. Give the primer the necessary drying time.
Use a good tape (gaffer tape or something similar). Cut three lengths of about 10 inches and stick above the window and loop up to the roof so it can easily be pulled down once the glass is in place.
Apply the adhesive to the side of the van on top of the primer, using the rubber strip as a guide. The adhesive obviously needs to be higher than the rubber strip or the glass won't even touch it, but the nozzle supplied has a nice 'V' grove in it. Make sure there is a continuous bead of adhesive and it's the same thickness/height all the way round. Any gaps will mean a hole between the glass and van, which will let in water. Two people are needed now... one person should apply the glass and manoeuvre it then press it into place - there is a slight amount of movement once the glass has touched the adhesive, but don't move it too far or it will stretch the adhesive too thinly . The second person should unroll the gaffer tape and press it onto the window. Once in place run a couple of strips down the side too. Sorry, no pics of this part of the process, it's one of those areas where time is important and as it's my first attempt, I wasn't messing around with a camera. However, I did read the instructions again. Once the glass is in, DO NOT JOLT THE VAN BY SLAMMING DOORS! Certainly don't drive it for at least two hours (I'm not driving it until tomorrow at the earliest). Follow the adhesive instructions about washing the van.
The windows are now in place and look pretty smart (except for the tape). I guess the moment of truth will be the morning when I take the gaffer tape off!