*NOW BOOKED FOR 2026* Transitmania 17 @ Santa Pod 17th to 19th July 2026 *ALL DETAILS HERE*


My Mk1 Transit's Restoration Project

This forum can be used to update other members on your progress with your Transit.

Re: My Mk1 Transit's Restoration Project

Postby malta transit » Tue May 10, 2011 10:00 pm

These last two days ,as i have told you i cut out the two rectangular mouldings ressesed in the metal work. These part below.

Image

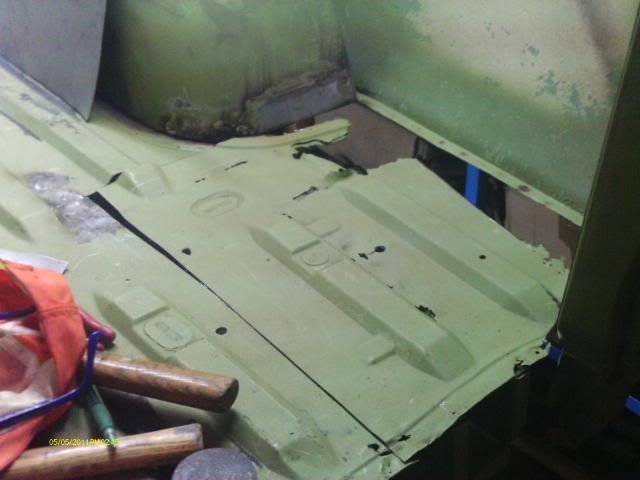
Then as i cut them out ,i drew them onto the new metal which is going to replace the rusted one.

Image

Then i cut of the drawn shapes so the old bits can be fitted exactly in place.

Image

These fitted perfectly.

Image

Than i mig welded the edges and linished them with a grinder which took quiet a long time to get them smoth.

Image

From underneath ;

Image

Tomorrow i will do the upper top left corner mould and if i 'll have any chance i'll give them a skim of filler to smoth the job.
8) 8)
TRANSITS KEEP YOU GOING!!!, GOING!!! AND GOING!!!!!!
User avatar
malta transit
Our man in Malta!
 
Posts: 1057
Joined: Sun Jun 03, 2007 2:13 pm
Location: malta

Re: My Mk1 Transit's Restoration Project

Postby Luke » Tue May 10, 2011 10:39 pm

attention to detail 10/10 8) 8)
User avatar
Luke
Site Admin
 
Posts: 44526
Joined: Wed Mar 02, 2005 12:53 am
Location: Rotherham, Yorkshire!!

Re: My Mk1 Transit's Restoration Project

Postby malta transit » Wed May 11, 2011 11:04 pm

As i have finished shaping the replacement rear panel,i could not weld it in as i noticed that you have to attach it to the rear light panel. This panel from the out side was rusted at one time as when i had sand blasted the edges i noticed that the rear panel were the red reflect is, was covered with filler. All these years ( 35 years of ownership)i have never knew that it was patched. Filler works well if it is done on clean surface.

Well the photos are not very clear as i forgot to go macro!!

The rear panel just spot welded and filled ip with filler.

Image

Image

So, I cut of the bodged up part,

Image

Image

I shaped up the rear panel with new metal and welded it in,

Image

Image

Then i just shaped out a new part to fit in perfectly,

Image

Image

Tomorrow i'll weld it up neatly and make up the next part to it.

8)
TRANSITS KEEP YOU GOING!!!, GOING!!! AND GOING!!!!!!
User avatar
malta transit
Our man in Malta!
 
Posts: 1057
Joined: Sun Jun 03, 2007 2:13 pm
Location: malta

Re: My Mk1 Transit's Restoration Project

Postby transitgeoff » Wed May 11, 2011 11:58 pm

nice work 8)
transitgeoff
Transit Extremist
Transit Extremist
 
Posts: 6574
Joined: Mon Mar 21, 2005 7:32 pm

Re: My Mk1 Transit's Restoration Project

Postby greek » Thu May 12, 2011 5:01 pm

Nice work Malta, patience is a virtue :D
I`m to old to lie under Transits
greek
Transit Aficionado
Transit Aficionado
 
Posts: 292
Joined: Sun Sep 17, 2006 7:24 pm
Location: NORTH EAST ENGLAND

Re: My Mk1 Transit's Restoration Project

Postby transitandy » Thu May 12, 2011 6:32 pm

A class act for sure :) 8) 8)
TRANSIT M8, SAY NO MORE YOUR IN...... FORD THROUGH TO THE BONE......
User avatar
transitandy
Transit Extremist
Transit Extremist
 
Posts: 17753
Joined: Fri Nov 30, 2007 1:10 am
Location: Essex...

Re: My Mk1 Transit's Restoration Project

Postby roelsmits » Fri May 13, 2011 6:23 am

good to see you're starting again :D
I keep an eye on your progress :wink:
keep this in mind it's really fun to drive a mk1 transit :!: :!: :!: :!:

gr Roel
User avatar
roelsmits
Transit Addict
Transit Addict
 
Posts: 82
Joined: Thu Apr 03, 2008 6:59 pm
Location: valkenswaard

Re: My Mk1 Transit's Restoration Project

Postby redcube » Fri May 13, 2011 10:59 am

Nice work so far
My camper van conversion viewtopic.php?f=58&t=76200
If any thing falls of will you mind picking it up for me
User avatar
redcube
Transit Devotee
Transit Devotee
 
Posts: 1589
Joined: Mon Aug 16, 2010 8:48 pm
Location: Co. Clare, Ireland right by the sea

Re: My Mk1 Transit's Restoration Project

Postby noah » Fri May 13, 2011 11:42 am

nice work..
noah
Transit Aficionado
Transit Aficionado
 
Posts: 406
Joined: Thu Nov 18, 2010 6:27 pm

Re: My Mk1 Transit's Restoration Project

Postby malta transit » Fri May 13, 2011 9:52 pm

transitgeoff wrote:nice work 8)

redcube wrote:Nice work so far
roelsmits wrote:good to see you're starting again :D
I keep an eye on your progress :wink:
keep this in mind it's really fun to drive a mk1 transit :!: :!: :!: :!:

gr Roel
transitandy wrote:A class act for sure :) 8) 8)
greek wrote:Nice work Malta, patience is a virtue :D


Thanks guys for the encouragement :D :D :D :D
TRANSITS KEEP YOU GOING!!!, GOING!!! AND GOING!!!!!!
User avatar
malta transit
Our man in Malta!
 
Posts: 1057
Joined: Sun Jun 03, 2007 2:13 pm
Location: malta

Re: My Mk1 Transit's Restoration Project

Postby malta transit » Fri May 13, 2011 10:42 pm

Today i tackled this corner as i had a hole at the end, but i realised i ran out of co2,so stoped here.

Image

So then i cleaned of the back beam ( overhanger spring holder ) from the rusted panel i had cut of the days before. Then i made a new outrigger to brace the cleaned one which i saved.

Image

Image

I had managed to add a bit of more detail to the panel;

Image

Then i cut holes in this new panel which i made for the rear bumper brackets. Here you can see the old original panel and the new one compared together.

Image

Image

Image

Image

Next week i 'll go and refill my tank with gas and figure out what and how to tackle next,so happy weekend :wink: :wink: 8)
TRANSITS KEEP YOU GOING!!!, GOING!!! AND GOING!!!!!!
User avatar
malta transit
Our man in Malta!
 
Posts: 1057
Joined: Sun Jun 03, 2007 2:13 pm
Location: malta

Re: My Mk1 Transit's Restoration Project

Postby alcapone » Fri May 13, 2011 11:18 pm

More well crafted panels there, well done, keep up the good work!
User avatar
alcapone
Sportvan Owner!
Sportvan Owner!
 
Posts: 296
Joined: Sun Nov 12, 2006 6:21 pm

Re: My Mk1 Transit's Restoration Project

Postby malta transit » Mon Jul 11, 2011 11:04 pm

:D :D Well as the smiley says, i'm happy today,as i have managed to finish off half of one side of the transit's bottom from rust :D :D

Here is what i have done so far;

As you can see below, i made a new panel and shaped it in a z shape. I spot welded it to the 1cm lip rising from the corner floor and spot welded it to the floor.

Image

Image

As you can see from the below picture the panel keeps on going down to cover the rear inside corner panel.

Image

I then scribed the panel i made to the corner panel and cut the offcut remaining panel off, and spot welded it them together.

As you can see i also welded the spring holder beam to the bottom of the floor. I fixed it 10.25cm away from the main beam after i measured the other side for exact measurerments.

Image

Image

I then welded in the new replacement outriger beam, which the original had disintigrated by rust.

Image

Image

Image

I also must inform you that i am leaving the rear right bracket bumper holder at the moment as i shall leave it for the end.

Well that all for today :D As from this week i have to move the van a few feet to the side so i can start work to the other side :?

8) 8)
TRANSITS KEEP YOU GOING!!!, GOING!!! AND GOING!!!!!!
User avatar
malta transit
Our man in Malta!
 
Posts: 1057
Joined: Sun Jun 03, 2007 2:13 pm
Location: malta

Re: My Mk1 Transit's Restoration Project

Postby Luke » Mon Jul 11, 2011 11:09 pm

superb mate 8) this will be worth another trip over to see it when it's done :mrgreen:
User avatar
Luke
Site Admin
 
Posts: 44526
Joined: Wed Mar 02, 2005 12:53 am
Location: Rotherham, Yorkshire!!

Re: My Mk1 Transit's Restoration Project

Postby malta transit » Mon Jul 11, 2011 11:17 pm

Yes Sure, but i bet you will be a bit older when finished. :lol: :lol:
TRANSITS KEEP YOU GOING!!!, GOING!!! AND GOING!!!!!!
User avatar
malta transit
Our man in Malta!
 
Posts: 1057
Joined: Sun Jun 03, 2007 2:13 pm
Location: malta

PreviousNext

Return to Members Transit's - Progress Reports!


Who is online

Users browsing this forum: No registered users

This site contains affiliate links for which we may be compensated.