Interiors looks great
*NOW BOOKED FOR 2026* Transitmania 17 @ Santa Pod 17th to 19th July 2026 *ALL DETAILS HERE*
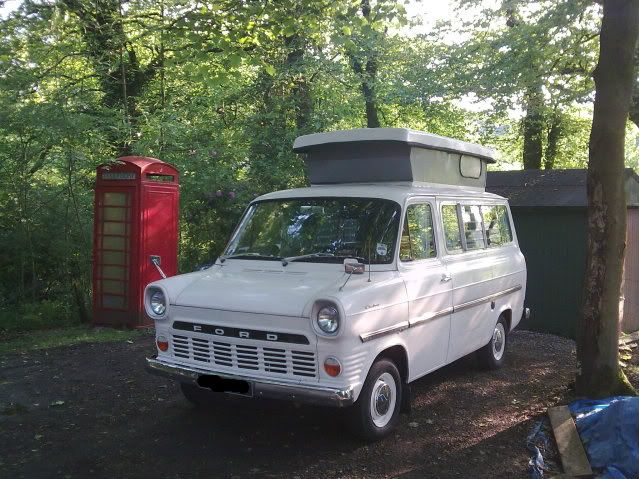
My latest project mk2 CI Travelhome LWB
Re: My latest project mk2 CI Travelhome LWB
![]() by montym100 » Mon Sep 19, 2011 5:23 pm
by montym100 » Mon Sep 19, 2011 5:23 pm
Loads of work done there, well done 
Interiors looks great
Interiors looks great
-
montym100 - Transit Aficionado

- Posts: 251
- Joined: Fri Jun 03, 2011 12:05 pm
- Location: Leeds
Re: My latest project mk2 CI Travelhome LWB
![]() by davev6newman » Mon Sep 19, 2011 8:01 pm
by davev6newman » Mon Sep 19, 2011 8:01 pm
Thanks fellas, shame the weather is going to be against me for the outside now, but ill do what i can.
-
davev6newman - Transit Devotee

- Posts: 971
- Joined: Thu Mar 09, 2006 7:57 pm
- Location: Luton
Re: My latest project mk2 CI Travelhome LWB
![]() by montym100 » Tue Sep 20, 2011 10:08 am
by montym100 » Tue Sep 20, 2011 10:08 am
davev6newman wrote:shame the weather is going to be against me for the outside now, but ill do what i can.
Tell me about it, stll trying to get mine finished but the weather has been Cr*p here for the last month
-
montym100 - Transit Aficionado
- Posts: 251
- Joined: Fri Jun 03, 2011 12:05 pm
- Location: Leeds
Re: My latest project mk2 CI Travelhome LWB
![]() by davev6newman » Wed Sep 21, 2011 7:45 pm
by davev6newman » Wed Sep 21, 2011 7:45 pm
Im dodging rain showers most of the time, this could be a big problem when i want to weld the windscreen surround up.
-
davev6newman - Transit Devotee
- Posts: 971
- Joined: Thu Mar 09, 2006 7:57 pm
- Location: Luton
Re: My latest project mk2 CI Travelhome LWB
![]() by davev6newman » Tue Sep 27, 2011 10:11 pm
by davev6newman » Tue Sep 27, 2011 10:11 pm
Right.............This is the last time i seal these windows up!!! I dare them to leak now, just you dare! 
As you can see i carefully masked up around the windows and put plenty of mastic on, then smoothed it over with the base of the mastic tube and removed tape, almost looks like theres a rubber there.


It was time to remedy the leaking exhaust gasket as the sealer kept blowing out, i wasnt sure that it would be possible as the bolts can be siezed solid. The top 3 are easy to remove with a socket as well as the first bottom one, but the two remaing bolts under the manifold can only be acccessed by a spanner, and a short one at that. Luck would have it that they shifted.


I had this trouble on my Jennings V6, the bolts were solid and had corroded so badly that a socket or spanner kept slipping, i had to resort to taking the head off just to do the exhaust gasket.
Fitted a new washer pump and new airfilter as well


When i got some different tyres fitted, i wire brushed the rims and painted them, what a difference it makes!!


As you can see i carefully masked up around the windows and put plenty of mastic on, then smoothed it over with the base of the mastic tube and removed tape, almost looks like theres a rubber there.
It was time to remedy the leaking exhaust gasket as the sealer kept blowing out, i wasnt sure that it would be possible as the bolts can be siezed solid. The top 3 are easy to remove with a socket as well as the first bottom one, but the two remaing bolts under the manifold can only be acccessed by a spanner, and a short one at that. Luck would have it that they shifted.
I had this trouble on my Jennings V6, the bolts were solid and had corroded so badly that a socket or spanner kept slipping, i had to resort to taking the head off just to do the exhaust gasket.
Fitted a new washer pump and new airfilter as well
When i got some different tyres fitted, i wire brushed the rims and painted them, what a difference it makes!!
-
davev6newman - Transit Devotee
- Posts: 971
- Joined: Thu Mar 09, 2006 7:57 pm
- Location: Luton
Re: My latest project mk2 CI Travelhome LWB
![]() by davev6newman » Tue Oct 18, 2011 8:02 pm
by davev6newman » Tue Oct 18, 2011 8:02 pm
I thought i would blow the dust of the welder and hopefully find minimal rust on the underside...who was i kidding!


As you can see im no expert welder but that spring hanger needed some extra love as well as the surrounding metal.


This is the back of the drivers side step and sill after i had taken a rotary wire brush to it, the passenger one doesnt look any better,as well as the other hanger. So MOT not any time soon!
The rear step was falling apart, so i made up a new frame using the old one as a pattern


Used hardwood decking for the tread, aluminium angle for the edge and chequer plate for the back.


Trouble is it dont fit as it is a bit chunkier than the original. It relies on the towbar as its support, so i will have to lift the supports 10mm, but am pleased with it all the same.
As you can see im no expert welder but that spring hanger needed some extra love as well as the surrounding metal.
This is the back of the drivers side step and sill after i had taken a rotary wire brush to it, the passenger one doesnt look any better,as well as the other hanger. So MOT not any time soon!
The rear step was falling apart, so i made up a new frame using the old one as a pattern
Used hardwood decking for the tread, aluminium angle for the edge and chequer plate for the back.
Trouble is it dont fit as it is a bit chunkier than the original. It relies on the towbar as its support, so i will have to lift the supports 10mm, but am pleased with it all the same.
-
davev6newman - Transit Devotee
- Posts: 971
- Joined: Thu Mar 09, 2006 7:57 pm
- Location: Luton
Re: My latest project mk2 CI Travelhome LWB
![]() by davev6newman » Sun Nov 06, 2011 10:23 pm
by davev6newman » Sun Nov 06, 2011 10:23 pm
Now to tackle the back 0f the step and sill.

There wasnt much metal to cut away actually and this is what i found~:

There had been a replacement sill fixed on at some point and im guessing that the old one was left in place as judging by all that rust.
New metal welded in


The outer sill had rusted away , so i cut that out and welded new metal in

The bottom of the near side wing had rusted away completely, so new metal welded in also (look better with a skim of filler).


And this is how far i got when the welder decided to pack up on me! Grrrr.......

Got to borrow one now
There wasnt much metal to cut away actually and this is what i found~:
There had been a replacement sill fixed on at some point and im guessing that the old one was left in place as judging by all that rust.
New metal welded in
The outer sill had rusted away , so i cut that out and welded new metal in
The bottom of the near side wing had rusted away completely, so new metal welded in also (look better with a skim of filler).
And this is how far i got when the welder decided to pack up on me! Grrrr.......
Got to borrow one now
-
davev6newman - Transit Devotee
- Posts: 971
- Joined: Thu Mar 09, 2006 7:57 pm
- Location: Luton
Re: My latest project mk2 CI Travelhome LWB
![]() by jerry2 » Wed Jan 25, 2012 9:46 pm
by jerry2 » Wed Jan 25, 2012 9:46 pm
getting there m8. looking good so far.
- jerry2
- Transit Aficionado
- Posts: 244
- Joined: Wed May 06, 2009 8:20 pm
Re: My latest project mk2 CI Travelhome LWB
![]() by malta transit » Thu Jan 26, 2012 9:55 pm
by malta transit » Thu Jan 26, 2012 9:55 pm
TRANSITS KEEP YOU GOING!!!, GOING!!! AND GOING!!!!!!
-

malta transit - Our man in Malta!
- Posts: 1057
- Joined: Sun Jun 03, 2007 2:13 pm
- Location: malta
Re: My latest project mk2 CI Travelhome LWB
![]() by davev6newman » Tue Mar 20, 2012 10:41 pm
by davev6newman » Tue Mar 20, 2012 10:41 pm
Well thats been a long winter, its been 4 months since i last done anything, so im going to make the most of some time off.
The cab area was soaking wet, so it was time i did something about it. I removed all the sodden carpet and removed the seats, heater box, glove box and dash panel and it was obvious that the windscreen scuttle was pretty rotten. I had already bought a used scuttle section off a member some weeks back, so it was time to bite the bullet.
Removing the windscreen was pretty easier than i had thought it would be, i just used a screwdriver on the inside and pushed the rubber back inside the lip, worked my round the screen and it just lifted out.

As i expected some bad rot but not the whole of the scuttle, so i only needed to replace a section which made life a bit easier.


I cut out the middle section of the scuttle and ground out the spotwelds to remove the rest. I also had to do this to the repair section which was quite time consuming.

Careful overlapping and marking and the section fits well.

I drilled 7mm holes around the repair panel and plug welded it in place.

Thats as far as i got today, but i got to make good the "A" post and top of the dash and the other small section on the drivers side.
The cab area was soaking wet, so it was time i did something about it. I removed all the sodden carpet and removed the seats, heater box, glove box and dash panel and it was obvious that the windscreen scuttle was pretty rotten. I had already bought a used scuttle section off a member some weeks back, so it was time to bite the bullet.
Removing the windscreen was pretty easier than i had thought it would be, i just used a screwdriver on the inside and pushed the rubber back inside the lip, worked my round the screen and it just lifted out.
As i expected some bad rot but not the whole of the scuttle, so i only needed to replace a section which made life a bit easier.
I cut out the middle section of the scuttle and ground out the spotwelds to remove the rest. I also had to do this to the repair section which was quite time consuming.
Careful overlapping and marking and the section fits well.
I drilled 7mm holes around the repair panel and plug welded it in place.
Thats as far as i got today, but i got to make good the "A" post and top of the dash and the other small section on the drivers side.
-
davev6newman - Transit Devotee
- Posts: 971
- Joined: Thu Mar 09, 2006 7:57 pm
- Location: Luton
Re: My latest project mk2 CI Travelhome LWB
![]() by davev6newman » Thu Mar 22, 2012 9:56 pm
by davev6newman » Thu Mar 22, 2012 9:56 pm
Cutting out the rot on the other side was going to be a bit easier than before.


Now to patch up behind the "A" post


I had some large corroded areas on the firewalltoo. So i cut them out.

And welded in new repair sections

Now to patch up behind the "A" post
I had some large corroded areas on the firewalltoo. So i cut them out.
And welded in new repair sections
-
davev6newman - Transit Devotee
- Posts: 971
- Joined: Thu Mar 09, 2006 7:57 pm
- Location: Luton
Re: My latest project mk2 CI Travelhome LWB
![]() by Neil » Thu Mar 22, 2012 10:25 pm
by Neil » Thu Mar 22, 2012 10:25 pm
GETTING THERE DAVE
Neil v6
- Neil
- Transit Extremist

- Posts: 5981
- Joined: Sun May 01, 2005 5:09 pm
- Location: Preston
Re: My latest project mk2 CI Travelhome LWB
![]() by transitandy » Thu Mar 22, 2012 10:50 pm
by transitandy » Thu Mar 22, 2012 10:50 pm
Indeed great work 
TRANSIT M8, SAY NO MORE YOUR IN...... FORD THROUGH TO THE BONE......
-

transitandy - Transit Extremist
- Posts: 17753
- Joined: Fri Nov 30, 2007 1:10 am
- Location: Essex...
Re: My latest project mk2 CI Travelhome LWB
![]() by davev6newman » Sun Mar 25, 2012 9:11 am
by davev6newman » Sun Mar 25, 2012 9:11 am
The dashboard was next, where the rain had been getting in it had dissolved along the window edge, up the "A" post and around the ball vent. So i welded some metal to the underside of the dash and along the frame edge.


And now for some filler.


A quick coat of satin black to seal it up, (i shall flat that back and apply some stopper at a later date).

I painted all the lip of frame with black and then replaced the windscreen, this went in easier than i thought especially on my own, and i will seal up the rubber with some black Tigerseal polyurethane sealant, expensive but perfect for the job.

And now for some filler.
A quick coat of satin black to seal it up, (i shall flat that back and apply some stopper at a later date).
I painted all the lip of frame with black and then replaced the windscreen, this went in easier than i thought especially on my own, and i will seal up the rubber with some black Tigerseal polyurethane sealant, expensive but perfect for the job.
-
davev6newman - Transit Devotee
- Posts: 971
- Joined: Thu Mar 09, 2006 7:57 pm
- Location: Luton
Re: My latest project mk2 CI Travelhome LWB
![]() by blue estate » Sun Mar 25, 2012 9:18 am
by blue estate » Sun Mar 25, 2012 9:18 am
You must have rust blindness by now but it's worth doing keep plugging on 
ŠKODA Enyaq full leather and heated steering wheel
Ford C max 2014 1.6tdci titanium black
Ford C max 2014 1.6tdci titanium black
-
blue estate - Remapped by Vantuner
- Posts: 19509
- Joined: Sat Dec 18, 2010 9:14 pm
- Location: Back in the saddle
Return to Members Transit's - Progress Reports!
Who is online
Users browsing this forum: No registered users