First off, i'm not the greatest home mechanic and i've never really done anything on a diesel before other than change the starter motor. If i can do it, you can too - you'll want plenty of disposable gloves though even if you only use them afterwards - eg for preparing food for your kids (you really don't want them ingesting diesel from your fingers).
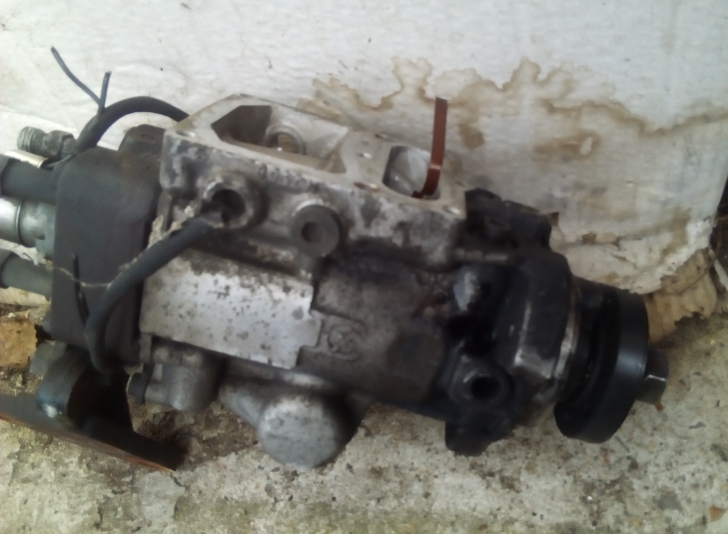
I killed the EDC from my pump trying to repair it myself. I got lucky and found a local mechanic who had a dead VP30 from another transit in his scrap metal bin. It had a seized bearing but later turned out to have the same duff transistor and fault codes as my original one. Thanks to Lord Kobrot on here for this tip.. you can tell the difference between the VP30 and VP44 quite easily - the VP30 has this large tear drop shaped solenoid on the back between the four injector pipe outlets - the VP44 does not have this (and you should be able to see this from under the van or from the top with the manifold out of the way).
Some say you need to check the part numbers match. I couldn't even see it on either pump / EDC so in truth i've no idea if they matched or not - but my fuel pump now works. No idea if VP30s from other brands / models are compatible. The VP30 and 44 are supposed to use the same EDC with different firmware - they're mechanically different though so it is possible that a VP30 from another brand might work - but it might not. IF you're desperate to get your pump fixed and can afford to lose the money on this risk it would be good to know if you get a VP30 EDC from a different make / model working in your transit.
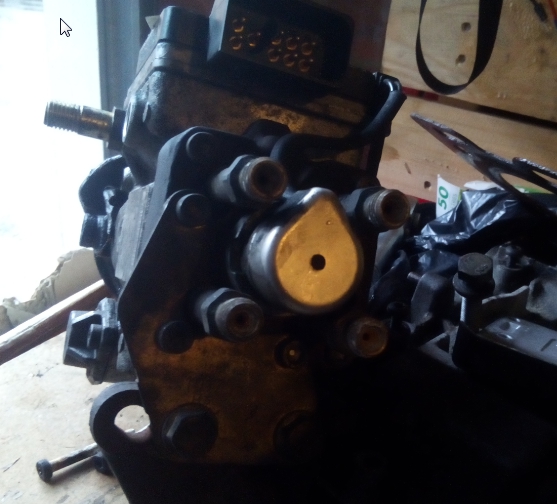
So this is the dead VP30 my mechanic found me which i removed the EDC from:

As you can see, it has a little square-ish chamber under where the EDC sits with V shaped pipes. This is normally full of diesel for some non obvious reason - it turns out that the diesel is used as a COOLANT. The transistor in the EDC that goes wrong is connected to the main body via a heatsink - which then has diesel passing over the surface of it directly below to keep it cool. Clever when you think about it but not immediately obvious.
Looking at it you can also see a hex bolt on the side that seems to be connected to the main mechanical pump underneath - this looks to be a BLEED SCREW. I could be wrong (and i suspect someone will correct me if i am) but it may be worth trying to bleed the pump from here when priming the engine and pump - i only noticed this after a lot of googling revealed the VP44 has a bleed screw. It seems logical that Bosch would apply the same principle to the VP30 and would also explain the way ford orientate the pump at an angle.
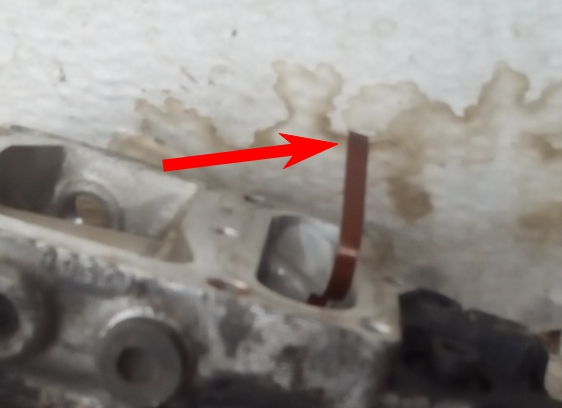
When removing the EDC directly underneath it is a very delicate ribbon cable attached to a magnetic sensing head (like the old heads used to play cassette tapes). You'll need a T10 MAGNETIC screwdriver bit to unscrew the two screws holding this in - be very careful. If you drop the screws into the pump you're dead in the water so make sure it's a magnetic tip. When refitting, the sensor actually sits in a little slot so you'll know when it's in correctly.
Failure to be careful with the ribbon cable can lead to it tearing - as happened with my old (already discarded due to a bad repair) EDC (I was practice refitting / removing due to the two screws that you can't drop into the pump - thought i best get some experience):
I had the EDC off that old pump and programmed it in using forscan - free to download and you can get a free 2 month extended licence that lets you perform programming. I also used the ch390 adapter from tunnelrat electronics to connect my netbook to the vans diagnostic socket. Note that this takes about 15 minutes and forscan will tell you to turn off the ignition, wait 6 seconds then tell you the module initialisation is NOT complete - try again? - wait 10 seconds, same result, another go and another go and another..

Just turn the ignition off and then back on - thats what did it for me - forscan doesn't actually tell you to turn it back on again and i think this is what causes problems. Delete the error codes, turn off and back on again disconnecting and reconnecting forscan also, read the codes and you should find that it stops grumbling about the remote immobiliser. After that I again found this one also had a duff transistor with codes P1664 and P1654. I sent it off this time and got that repaired by someone who knows what he's doing and it came back good but then i had trouble getting the van going. The guy i used is on ebay and has a long list of strict instructions to follow and mentions a 4 day cure time (plus postage each way) - eBay listings
So when it comes to refitting the EDC, you should not solder the solenoid wires back together - it may be tempting but you're advised to crimp instead. The reason being the wire strands are aluminium which carries heat away a lot easier than copper... straight to that sensitive transistor. Don't expect this to be quick or easy - due to the confined space between the pump and engine it took me around two hours to get this done for both solenoids. To make it easier for future removal / replacement, I opted to use bullet crimps so that they can un/plug as needed. I used blue on one solenoid and red on the other - with one plug on one EDC wire and then a socket on the other EDC wire - and vice versa for the solenoid wires. This means that they can't be connected the wrong way round in the future. As mentioned above, you may find you are able to bleed the pump itself while priming which should make life a lot easier.
As for priming, this is an absolute pig of a job and i've read a few peoples comments online saying their van never ran again after the EDC repair etc. It was frankly quite stressful so if you've never done this before (like me) don't give up - just keep at it. Diesel engines turn out to be quite simple once you ignore all the other crap bolted on like turbos, intercoolers, EGR valves etc. As long as it gets it's bang bang juice, it will run - even without an inlet manifold. If it won't run, it's not getting juice so you need to make sure you prime and bleed as much as you can. You'll need a priming bulb from Halfords and some PVC tubing with a 9mm internal bore - i got mine from B&Q. The fuel pipe from the filter housing has a very tiny button on the edge of the clip to release it - you can't see it though. If you press on the edge of the fuel pipe connector with your thumbnail, one bit will press inwards. Now, there's a trick to this, press it down and push the fuel pipe FURTHER onto the fuel filter housing pipe - this lets the little mechanism inside fully relax and then you can pull it off. Don't press and try to pull off, it won't go anywhere, push it further on first. So with that out of the way, the target is the right hand side of the fuel filter housing and the front / nearest pipe. Remove it, attach the PVC tube to this and the other end to the bulb primer. Now for the fuel pipe end i had to get creative and find a bit of plastic tube to push into the fuel pipe and then put the PVC over that. The pipe on the fuel filter housing is 10mm so you'd need something with an outer diameter of 10mm to be a good fit - the 9mm internal PVC tube will still fit onto this.
Start pumping. The bulb pump is supposed to go hard. Mine didn't even after 45 minutes. Instead undo the injector pipe for the injector at the front until diesel seeps out (and it will do this quite quickly as you pump). Tighten it again. Now the next one. The third one i couldn't get any diesel from and nor the 4th at the back. Turning the engine clockwise by 90 degrees changed that and i soon got diesel from the 4th injector pipe. The third one was a lost cause and i couldn't turn the engine over any further as it had reached a compression stroke and i could only get a hand ratchet on the crank (which annoyingly had 3 bolts instead of one in the middle).
At this point i've cranked with the key for around 12 seconds and then started to hear slight sounds of diesel splutter which became gradually stronger and louder until it fired completely and forced out a big black cloud from the exhaust. Due to never having primed or bled a diesel before this actually took me several days to achieve but i've shortened it to a couple of paragraphs for those in need. My van has dead glowplugs - the relay was broken (melted inside) and when replaced the fusible wire link went up in smoke. Despite that it still starts in around 3-4 turns of the engine - sometimes 2. If you have dead glowplugs too, don't worry about trying to get them fixed to fire your engine up, just concentrate on getting it primed and bled and you should be okay.
Have an extra power source available for starting - jump leads / power pack etc, whatever does it for you as you'll almost certainly need it. Once it's running, leave it running for a few minutes and then turn off and remove the priming bulb and reconnect the fuel line to the fuel filter housing. As if my magic, the fuel that's fallen back down into the tank doesn't seem to make any difference (possibly a one way valve in there somewhere?) and it will fire up again and keep running.
Thats my story and discoveries, I hope it helps someone out there..