*NOW BOOKED FOR 2024* Transitmania 15 @ Santa Pod 19th to 21st July 2024 *ALL DETAILS HERE*
Connect sill repair part 1, 2 , 3 showing before repair
Re: Connect sill repair part 1, 2 , 3 showing before repair
![]() by Boghopper » Sat Oct 22, 2022 11:53 am
by Boghopper » Sat Oct 22, 2022 11:53 am
Gave it a clean up today, and off we go, chasing rust along the van on a never-ending journey:
- Boghopper
- Transit Aficionado

- Posts: 322
- Joined: Fri Feb 05, 2010 11:27 pm
Re: Connect sill repair part 1, 2 , 3 showing before repair
![]() by metalworker0 » Sat Oct 22, 2022 6:19 pm
by metalworker0 » Sat Oct 22, 2022 6:19 pm
magnets ..a lot of water has gone under the bridge since purchased ..i wouldn't want to steer you to some week ones
but think they were 32 x 6.8 mm
my friend can't find the sale in his email.
looks like you have roughly the same amount of rot as mine, there's a lot hidden in those middle sills......like becoming detached all the way along from the outer and inner...only seen once you remove the outer.
picture full size...bigger than i originally uploaded to here ..all below the red line was gone ..where the arrowhead ends in foreground you can see some of what it looked like before full rot, at half rot stage.
it all had to be taken off..so non was left ...as even mild rust acts like a sponge once wet.
You do not have the required permissions to view the files attached to this post.
-

metalworker0 - Transit Fanatic

- Posts: 2111
- Joined: Wed May 05, 2021 4:43 pm
- Location: Prestatyn
Re: Connect sill repair part 1, 2 , 3 showing before repair
![]() by Boghopper » Sat Oct 22, 2022 8:11 pm
by Boghopper » Sat Oct 22, 2022 8:11 pm
The magnets, I will see if I can find them, there are so many Chinese movers flogging them, but 99% of them will be crap.
Well, you see, as I have said in the past that I have been mixing waxoil and fresh mineral oil blasting it up into the outer cill. Well, if I look through the holes I have cut on the inner cill there is no rust in the outer cill cavity. It is all gooey, and oily with all the stuff I have been blasting in there over the years. All my rust is on the inner where I couldn't get any oil into.
It seems to be worse on the N/S as well, must be all the muck led in the verge.
What pisses me off with all this, is that if Ford spent a bit more effort on it, instead of all their efforts going into flashing lights and stupid bloody noises in the cab, then it would never happen. There is obviously the cynical side of me that says it is done on purpose.
- Boghopper
- Transit Aficionado
- Posts: 322
- Joined: Fri Feb 05, 2010 11:27 pm
Re: Connect sill repair part 1, 2 , 3 showing before repair
![]() by Boghopper » Sun Oct 23, 2022 1:51 pm
by Boghopper » Sun Oct 23, 2022 1:51 pm
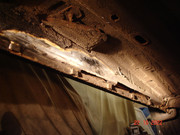
I do not know what exact van you have, mine is a LWB. My main source of all water seems from the seatbelt mount as you can see the rot leading right to it. I mean, what a setup to have all this convoluted mess to mount a seat belt. Anyway, it is open at the top so water can flow into the sill caity at leisure. Ford have kindly put a drain inside the outer cavity and directly under this mount. This is supposedly to let all the water accumulated on the top of the seat belt mount, to then flow into the cill cavity and straight down through and out the drains at the bottom seam of the cill. Unbelievable thinking! Let's collect as much water spray as we can and take it into the cavity and flow out the bottom. Obviously it hasn't flowed out, but flowed along the bottom of the cill and rotted it all out
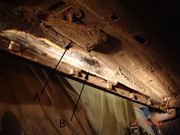
A, is the mount, B, is the rust leading to it coming from inside.
I have also found, that sandwiched between the two skins, and wrapped around this mount is a huge rubber/ plastic sort of damper. Which is non removable and is right where I wanted to weld, did yours have this huge chunk of rubber between the skins?
This is looking directly up into the cavity and at the seat belt mount.
Cheers.
- Boghopper
- Transit Aficionado
- Posts: 322
- Joined: Fri Feb 05, 2010 11:27 pm
Re: Connect sill repair part 1, 2 , 3 showing before repair
![]() by metalworker0 » Sun Oct 23, 2022 5:07 pm
by metalworker0 » Sun Oct 23, 2022 5:07 pm
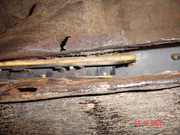
Page 5 picture 10
no clutter around it like yours
and there were no lumps of rubber inside
it has no side doors
its short wheelbase......well at least i think it is
as i compare it to some mk1s swb ..it seems taller ..but does not have extra roof ..it seems longer ..but it's not a long wheelbase ..they all look smallish
compared with one made in the last ten years, mine dwarfs them.
having said that it does have 16 inch wheels instead of the 15 and they are not super low profile
looked at the dimensions online of mk1 and mine is different to them....the ones i found seam to say it's in-between a swb and a lwb
no idea what's going on in your last picture as there are no reference points to let me know where on the car or what orientation you are at.
all the best.mark
-
metalworker0 - Transit Fanatic
- Posts: 2111
- Joined: Wed May 05, 2021 4:43 pm
- Location: Prestatyn
Re: Connect sill repair part 1, 2 , 3 showing before repair
![]() by Boghopper » Sun Oct 23, 2022 5:58 pm
by Boghopper » Sun Oct 23, 2022 5:58 pm
You see, I can see my seat belt mount bolt poking down through the floor pan, like yours, except, as you say, yours does not have that large piece. I have one on either side. I am now thinking it is something to do with the side doors but it isn't really in line with the side doors, but the pillar between the front and rear door. Anyway, the last picture is looking directly up into the cavity from below showing the huge piece of rubber and plastic wrapped around this piece underneath. The actual rubber is within the inner and out skins.
I now see what it is for. When the side doors are closed the bottom runner goes into this housing which protrudes under the van, straight through every skin of the cills.Totally open, with none of the seams sealed anywhere.
It doesn't matter as you don't even have the large metal housing brackets underneath, let alone the rubber. I have been trying to think what to do about it but, it cannot be removed. The only thing is to cut a huge piece out so the actual welding is taken away from its proximity. I cannot even see it listed on Microcat.
Can't find any magnets that are like yours.
You seemed impressed with the Upol sealer, was it the P.U.Tiger stuff, that comes in the tubes that you used?
Cheers.
- Boghopper
- Transit Aficionado
- Posts: 322
- Joined: Fri Feb 05, 2010 11:27 pm
Re: Connect sill repair part 1, 2 , 3 showing before repair
![]() by metalworker0 » Sun Oct 23, 2022 6:28 pm
by metalworker0 » Sun Oct 23, 2022 6:28 pm
Yes ..Tiger seal ..
RUBBER ..there were 2 lumps of "sponge" in plastic bags that i took out of the wings, these were not rubber...but chucked them as i thought they were rust agents. Don't know why they were there ..noise reduction - anti drumming or to stop people being unhappy when they tap the panels with hands and make a cheap tin sounding noise is the only thing i can think of.
There was a big thing were road testers for magazines or tv show, always slammed to door ,..and were listening for a reassuring clunk rather than a tin rattle ..VW boasted about it ...and all manufacturers had to follow suit. maybe it's there to make that happen.
all the best.mark
-
metalworker0 - Transit Fanatic
- Posts: 2111
- Joined: Wed May 05, 2021 4:43 pm
- Location: Prestatyn
Re: Connect sill repair part 1, 2 , 3 showing before repair
![]() by rustandoil » Fri Feb 03, 2023 8:27 pm
by rustandoil » Fri Feb 03, 2023 8:27 pm
My lad has just done both sills on my 2010 Connect.... He's done a very good job, but it was a miserable experience
- rustandoil
- Newbie
- Posts: 5
- Joined: Thu Jul 23, 2020 6:04 pm
Re: Connect sill repair part 1, 2 , 3 showing before repair
![]() by metalworker0 » Fri Feb 03, 2023 11:00 pm
by metalworker0 » Fri Feb 03, 2023 11:00 pm
Not very nice working on them at this time of the year.
all the best..mark
all the best..mark
-
metalworker0 - Transit Fanatic
- Posts: 2111
- Joined: Wed May 05, 2021 4:43 pm
- Location: Prestatyn
Re: Connect sill repair part 1, 2 , 3 showing before repair
![]() by rustyconnect » Thu Apr 18, 2024 7:39 pm
by rustyconnect » Thu Apr 18, 2024 7:39 pm
I know this thread has not been active in a while however I am a new member and unable to send PM's yet.
I just wanted to say thankyou for such a detailed writeup, about to embark upon a similar but hopefully less rusty path myself.
I picked up a 52 plate connect last year, heck I even put my finger through the sill when buying it. Decided its time to finally dig out the MIG welder after the trolley jack bucked the rear sill also
- rustyconnect
- Newbie
- Posts: 1
- Joined: Fri Jul 21, 2023 4:25 pm
Re: Connect sill repair part 1, 2 , 3 showing before repair
![]() by metalworker0 » Fri Apr 19, 2024 2:10 pm
by metalworker0 » Fri Apr 19, 2024 2:10 pm
Well good luck, hope you don't find as much rust as i did .
Would i do it the same way again, well now I've watched lots of videos by "yorkshire car restoration" i think i would do a few things a bit different. note: yorkshire are working with older cars that generally have thicker metal than the connect!
https://www.youtube.com/@yorkshirecarrestoration
if working outside.
There is also pressure on you to get it done quickly and the frustrating thing is: wind, rain and cold, daylight..which will all stop you ..you cannot weld even in a light breeze, it blows the shielding gas off the weld, resulting in a bad weld. so you need wind breaks even on a calm day.
Being cramped underneath in a small space prevents good dexterity.
There will problems seeing weld through mask due to you being in the dark and looking towards outside which is light...strongly recommend powerful lights pointing at the weld, that's if you can find space for them.
Note weight of engine ...it's cantilevered past jacking points..so important to support van , so that when you take metal out , engine weight does not distort panels.
Time.
Remember this - Everything takes a long time, if it doesn't , you are not doing it right. don't expect things to magically happen .. you need a lot of Patience - look at the time of this thread from first post to last post when im pouring paint into the sills ..that time span was for 1 side . maybe 15 -20 hours each week, which is all the weather would give me..some of it thinking ..some of it doing. Note, there were a lot of other jobs done at the same time, some not shown.
Like sand blasting inner rear wheel archers, blasting and painting spare wheel mechanism, rear cross member was blasted, underside where the spare wheel fits, bracketry that was there for anti roll bar ..the whole area was blasted ..i cleaned and treated the rear liners with solvent based "water seal"
FIRST JOB
Strongly recommend that you take the wheel arch liners out, you then paint on degreaser, power wash the underside to get off all grease/ oily residues, muck and dirt .out of box sections / all surfaces.so that when you finish the job and paint and waxoyl ...its dry and ready to paint and not impeding you.
all the best.mark
-
metalworker0 - Transit Fanatic
- Posts: 2111
- Joined: Wed May 05, 2021 4:43 pm
- Location: Prestatyn
Who is online
Users browsing this forum: No registered users